Interface guidelines
This section describes the best practises for providing a user interface to interact with the NearSt Partner API.
Note: the principles described on this page can be seen in action in our Example UI.
Reference implementation diagram
Setting up a retailer account
The first thing you’ll want to do when a customer of yours has indicated they want to start using the Local Inventory functionality (possibly by enabling the feature in your dashboard), is creating a retailer account for the customer within NearSt.
In most cases, you will already have all the required information to do so. If not, provide the customer a form to fill in any missing information that is required, and then execute the API call to create the retailer account.
Keep track of the ID of the new retailer account in your database so that you can identify the correct NearSt Retailer ID for each of your customers.
Selecting an inventory management system
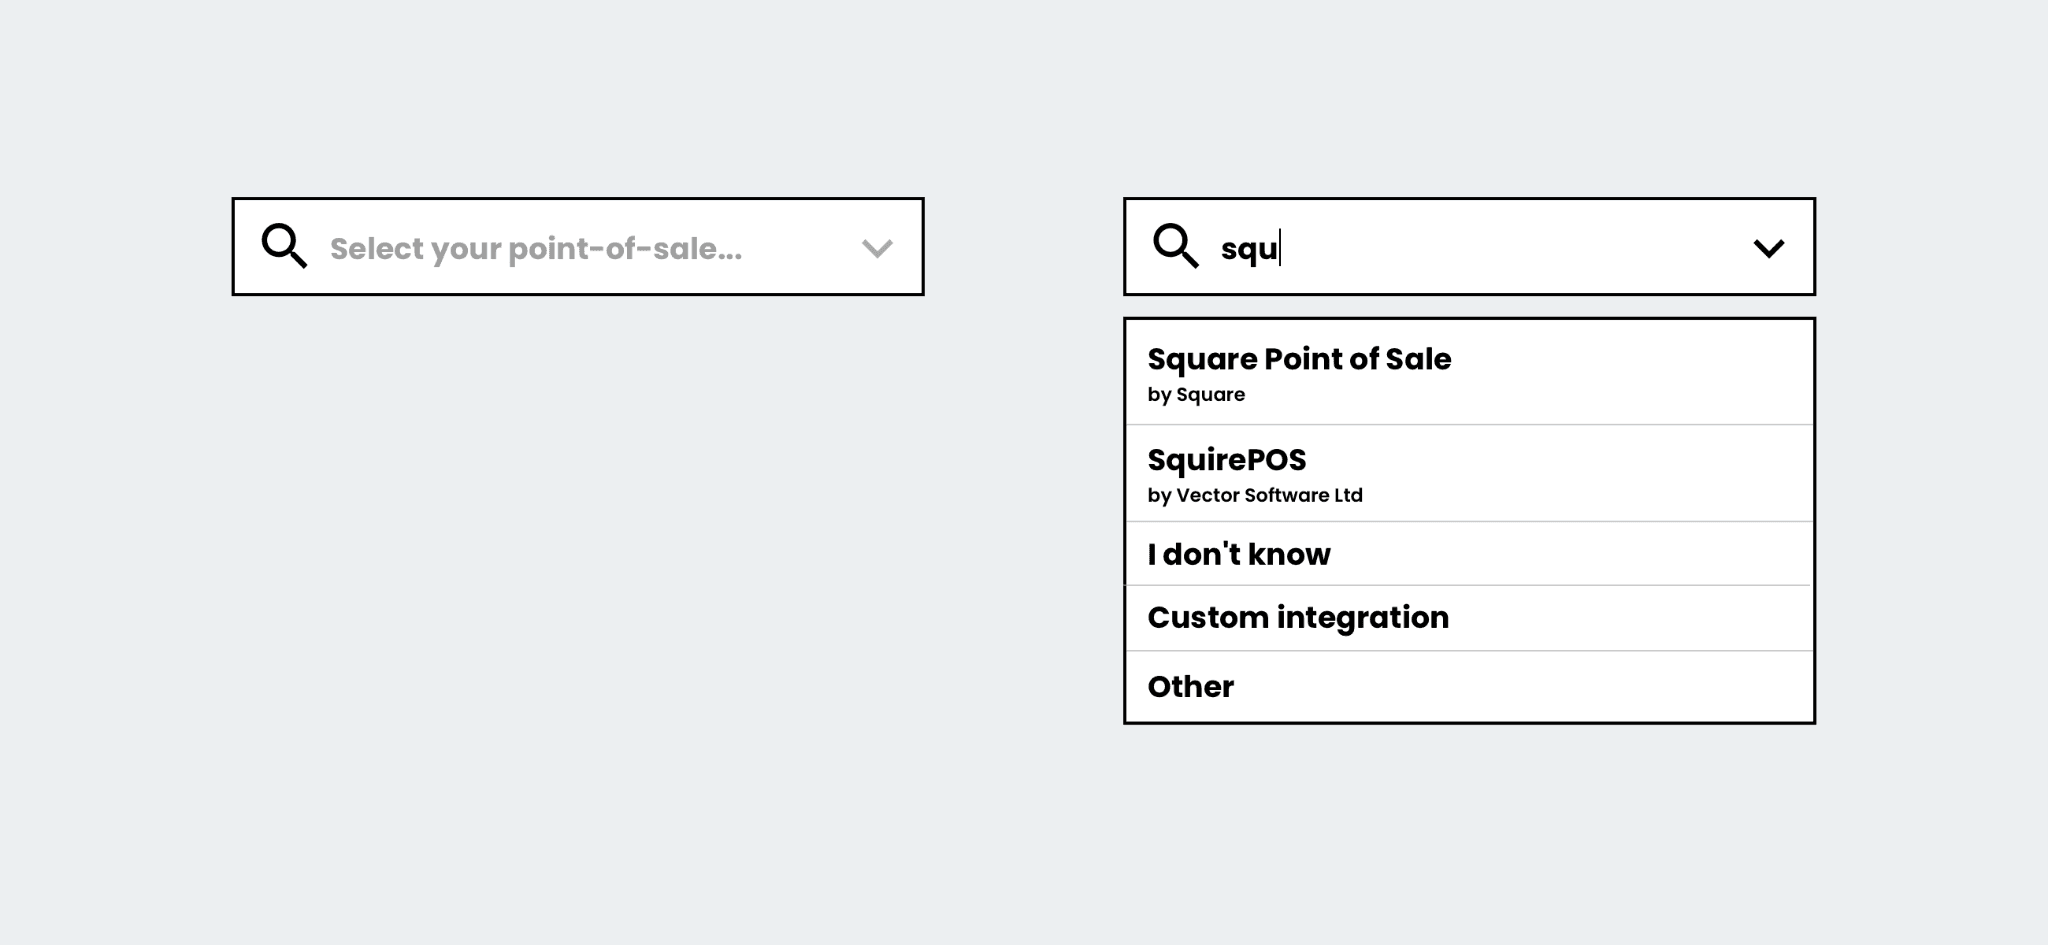
Next, provide the customer with a dropdown list of point-of-sale systems they can choose from to select the system they
use to track their inventory. The GET /inventory/providers endpoint should be used to get a list of supported systems.
Best practises:
- There will be a lot of options in this dropdown. Providing a dropdown list that can be searched within (like react-select (opens in a new tab)) will help the user find the option that is relevant for them.
- The API will offer a set of generic options (where
typeis equal togeneric) that the retailer can choose if their system doesn't appear on the list. Make sure these are always clearly visible in the list, possibly by displaying them fixed at the bottom of the dropdown. - The API will return both a display name for each option (field
label), as well as the name of the software vendor (fieldvendor). Displaying the vendor in a smaller font size below the display name might help retailers find their POS in cases where the software name and vendor name differ significantly.
Inventory management system next steps
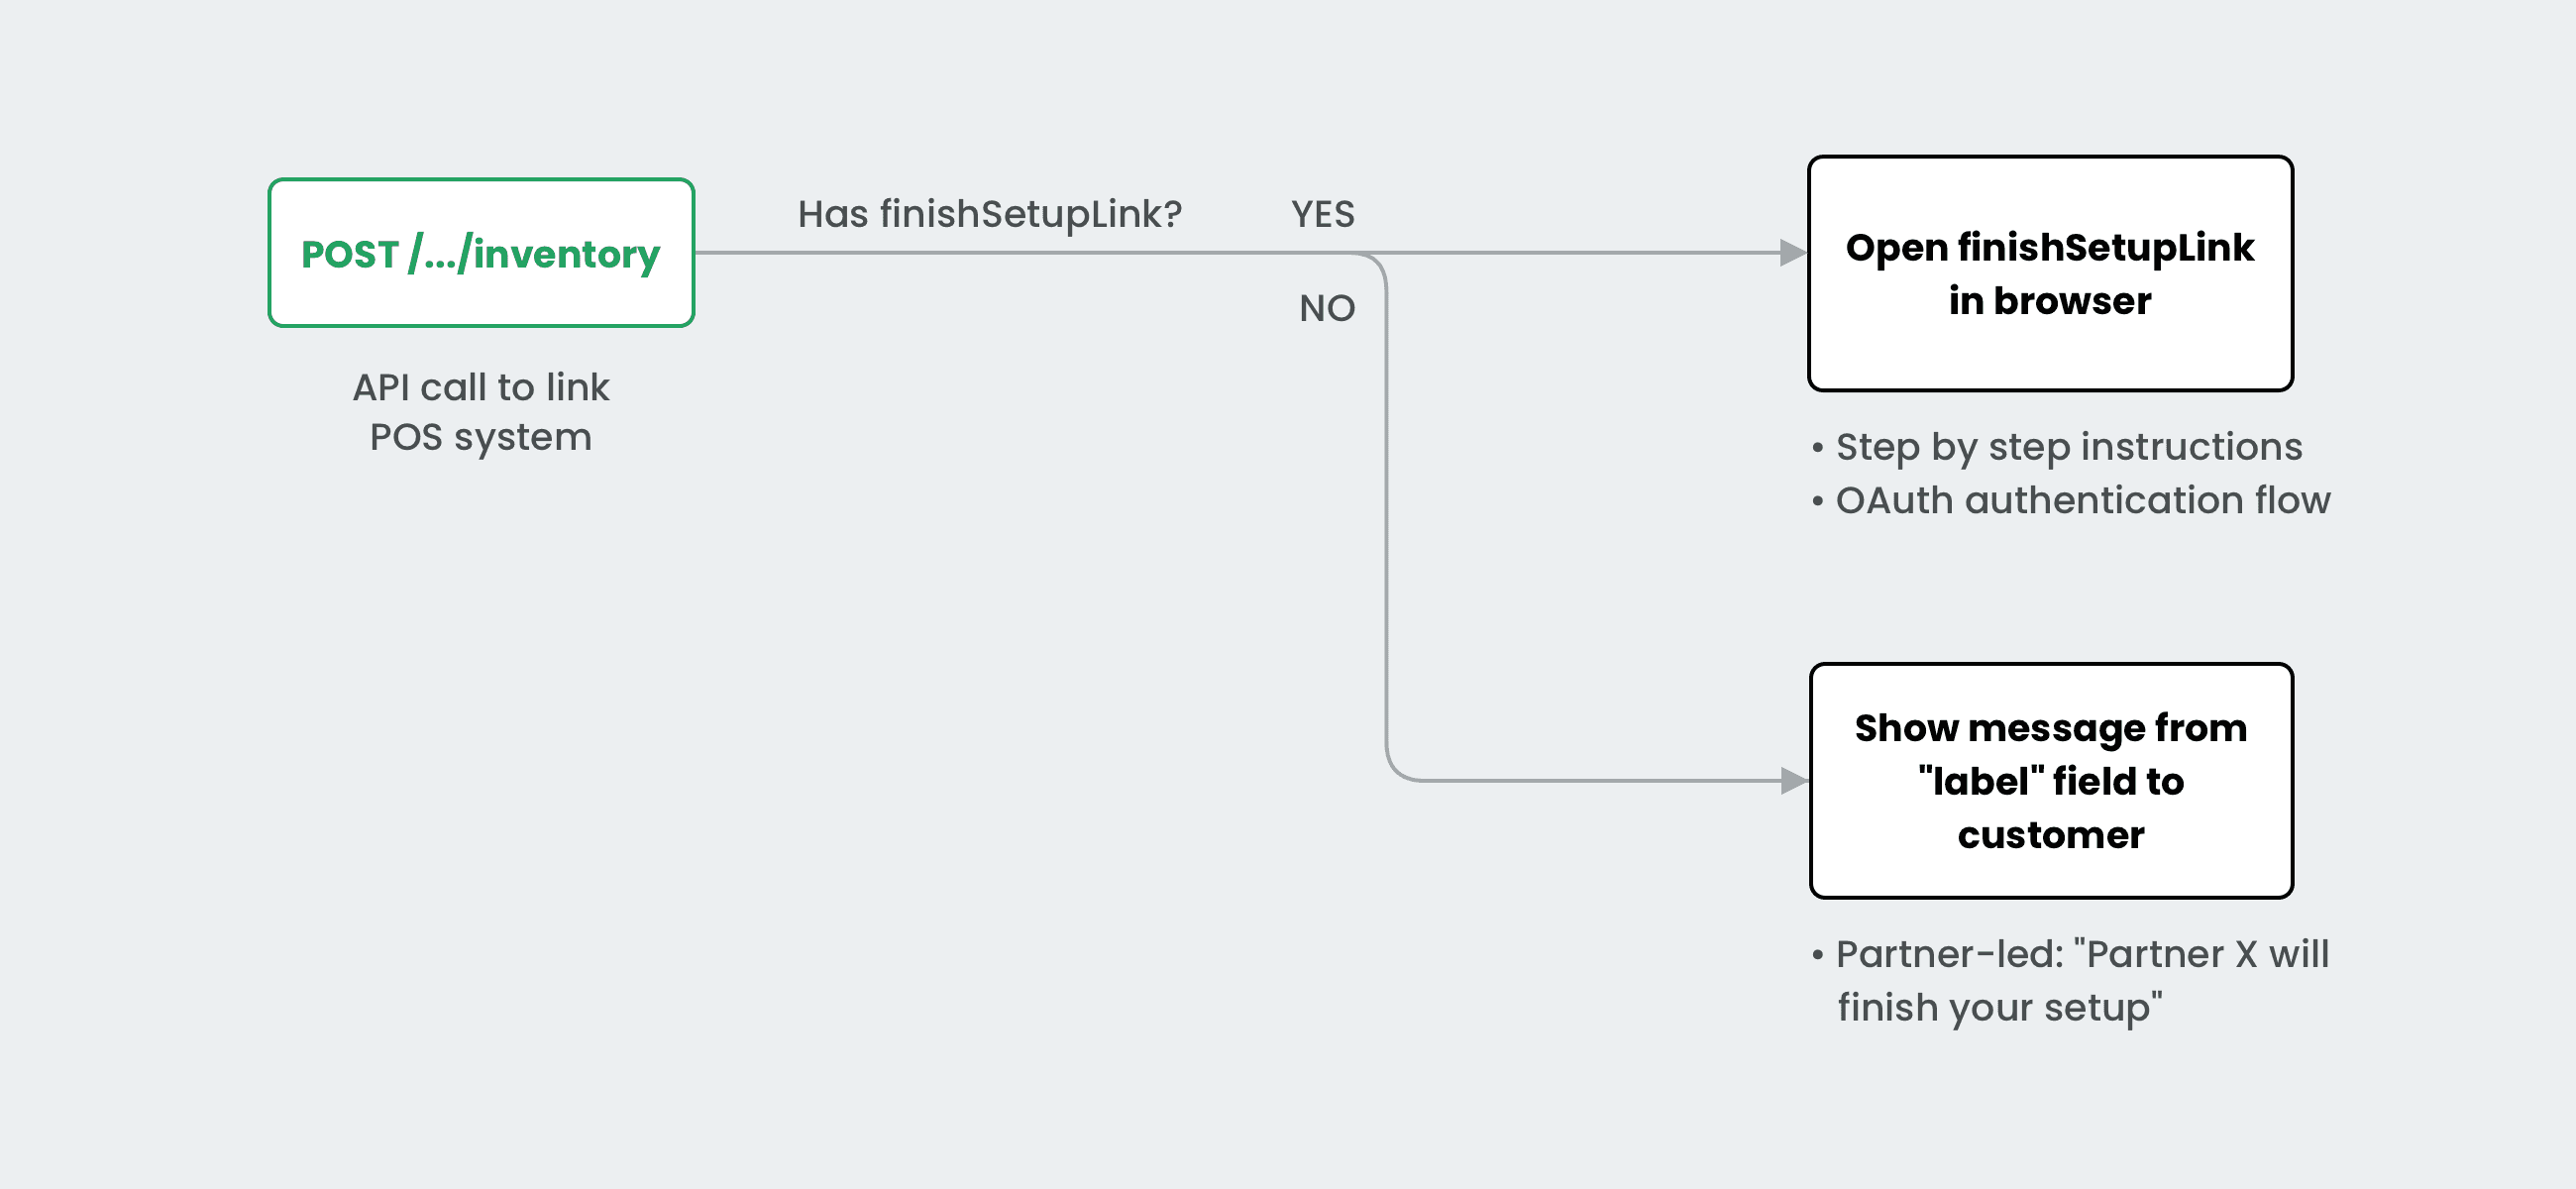
After selecting a point-of-sale system and submitting it via the API (POST /…/inventory), the API will return
a nextSteps object with two fields:
- A
label: this should be displayed to the customer to indicate the status of the integration and what needs to happen next.- This may be about the retailer being required to click ‘on the link below’ to finish their setup (most common).
- This may be about having sent a request to their POS vendor, who will take care of connecting them in the next couple of days (common).
- This may tell the retailer our team will get in touch with them in the next 48 hours to finish the setup, in case some manual interaction is needed to finish the integration (least common).
- A
finishSetupLink: if this property has a value, it should be displayed as a button with the text ‘Finish setup’. By clicking it, the retailer will be sent to a NearSt-hosted page where they can complete the action that is required to finish the setup.
Best practises:
- When redirecting to a NearSt-hosted page, make sure to revalidate the inventory connection status when
the customer returns to your website (ie. when the window gets focus) by requesting the inventory status from
the
GET /…/inventoryendpoint. - Open the NearSt-hosted page in an overlay iframe or a popup, rather than in a new tab. It is optimised to be displayed in a small frame of roughly 600 x 500 pixels. Don’t forget to include a close icon in the top right corner to allow the customer to return to your dashboard.
Connecting to channels
After the inventory is connected (inventory status field will have value connected), you can allow the retailer to
connect to channels where they wish to show their products.
It might be helpful to show the list of channels you offer as a vertical list with ‘enable’ buttons next to each of the channel names.
Similarly to connecting to inventory, once you request a channel connection, there will be a next step label
and/or finishSetupLink available. The above guidelines apply for how to best display these.
Similarly to inventory connections, channel connections have three possible status values:
pending- awaiting setup to finish, either by customer action or by automated/background action, like Facebook approvalconnected- channel is live and product profiles are being sentdisconnected-previously connected but disconnected,nextSteps.labelwill have more details
A big difference is that channel connections always need to be set up on a per-store basis, as every store needs to be connected to its own Google listing or own Facebook page.
NearSt Branding
The Partner API is set up to be white-labelled, meaning that the NearSt brand is not visible to the end user. This is done to ensure a seamless experience for the end user, and to allow you to fully own the customer relationship.
The NearSt-hosted pages for finishing inventory and channel connections are hosted on the generic
inventory-connect.com domain, and can be set up to hide the NearSt branding. It can be customized to use the
retailer's logo and accent color.
Contact details
NearSt requires you to specify contact details for each retailer. These will be used to contact the retailer in case any custom next steps are required that aren’t fully automated, or where any manual issue resolution is required.
In cases where it is not acceptable for the NearSt team to directly get in touch with the retailer, it is possible to specify an internal contact (e.g. someone in your account management team) that can act as a liaison between NearSt and the retailer.
We have a few requirements to ensure smooth communications in this case:
- Specify both a contact email and contact phone number for your internal contact. These should be the details of one person on your team, rather than a generic support contact.
- Specify a 'contact name' value that indicates this is an internal contact, for example:
Lisa Appletree (PartnerName accounts) - The internal contact should pass messages from the NearSt team on to the retailer in a timely manner, and be aware of the basics of the NearSt integration.